'Daddy's Lil' Monster' Tee
Plain White T-Shirt (Get it
Bigger than your size)
Red Paint
Black Paint
Textile Medium
Blue Dye or Blue Paint
Scissors
Printer
Charcoal or sketching Pencils
Sewing Machine (Yes, I finally fixed mine)
Black Thread
White Thread
Black Sharpie
Sand Paper
Black and Brown eyeshadows and bronzers
1) First I would suggest sketching out the line work on the sleeves before painting them on so that they are even. Also, draw the line of where the red top part should start and stop. Also, cut the shirt to make it the appropriate length for you. Note: The sleeves should be longer. Also, The shirt, on me, looked boxy so I cut out some of the sides and sewed them back together. On Harley's shirt, It looks like she did that as well,
2) Cut out the area of the red part out of the shirt. (Optional, but suggested for an exact prop replica)
3) Mix Textile medium (If you have it. if you don't, use water instead) With red paint.
*MAKE SURE TO FOLLOW THE DIRECTIONS ON YOUR TEXTILE MEDIUM*
4) Paint the piece of shirt that you cut out red.
5) Let it dry.
6) Paint the lines that were traced on the sleeves red as well.
7) Let them dry.
8) After both parts are dry, Sew the red piece back onto the shirt where it was cut out of. Use black thread. You can either use a sewing machine or hand stitch it.
9) Now for the text. I printed out the text onto a paper (Make sure to size it correctly to your shirt. Photoshop works great for that. I placed the picture in the shirt, then traced the text with a pencil. You can either free hand it with a pencil or use the printer method.
10) After I finished tracing, I mixed the paint with the textile medium (or water), then filled in the traced letters with black paint. if the edges get a little rough, use a black sharpie to even them out.
11) Let that dry.
12) Take one of the sleeves (I used the right, due to the fact that I made everything inverted due to the fact that I am left hand dominant, making the bat wielding easier) And dip it in the blue dye. I used one drop of my blue hair dye and water which worked great, but you can also use blue paint and water. Very little paint is needed for this mix.
13) Let the sleeve dry.
14) Now for the weathering and detailing.
~Harley, on the blue side of the shirt has a little star drawn on the red coloured top part of the shirt. It's coloured in black.
~Across the blue side as well, Harley has a cut on the breast of the shirt, which is sewn together with Black thread.
~Across the red side, there is a longer cut underneath her breast which is sewn together with white thread.
~The shirt, both front and back, is weathered greatly. Lay the shirt on concrete or blacktop, and take the sand paper rubbing it back and forth to create holes.
IF YOU WANT YOUR WEATHERING TO LOOK REAL, DO NOT USE SCISSORS!!!
~ The collar of the shirt is cut up, so completely take off the area with the tag attached.
~Overall the shirt is dirty, so I took some black and brown eyeshadows and bronzers, rubbing them on messily to give the effect of dirt.
'Burn After Use' Tank Top
Plain White Tank Top (NOT A CAMI)
Charcoal or sketching pencil
Sponge
Black Paint
Textile Medium
White Paint
Scissors
Printer (Optional)
1) Print out an Image of the text needed. Place it underneath the shirt. Make sure that it is centered.
2) Mix Black Paint with Textile Medium (Follow the directions on the bottle)
3) Colour in the lines of the letters.
4) Let it dry.
5) Dip a sponge in a little bit of white paint, sponging it over the letters slightly, giving them a look of weathering.
6) Let it dry.
7) Cut holes where the straps are on both the front and the back right above the breast.
Blue and Red Booty Shorts
White Leggings
Scissors
Charcoal or Sketching pencil
Textile Medium
Red Paint
Blue Paint
Sewing Machine
White Thread
1) Put on your leggings and have someone else draw a circle around where you will make your cut, turning them into shorts. (Make sure you leave room to hem)
2) Cut off the pant legs
3) Hem the bottoms of the leggings where they were cut.
4) (OPTIONAL) Cut shorts in half down the center.
5) Paint one side blue and one side red.
6) Let it dry
7) (IF FOUR WAS DONE) Sew sides together.
Goodnight Baseball Bat
Baseball bat
Pencil
Sharpie
Red paint
Black Paint
White Paint
Blue Paint
White Tape
1) Write out the 'GOOD NIGHT' Text along the bat in pencil, then go over the tracing in black sharpie.
2) Fill in the letters with Red paint.
3) Let it dry.
4) Put white tape around the handle of the bat.
5) Right where the tape ends, trace out the Diamond pattern in pencil.:
6) Colour it in with the correct colours (Red, Blue, White)
7) Let it dry.
8) Most people do not know the scribbled text along the bat, but For that, I just wrote out some signature Harley quotes as well as the hash marks, the 'ha ha's, and a few names like 'Puddin'. 'Red', 'Selina', and 'Mr. J'.
9) Let that dry
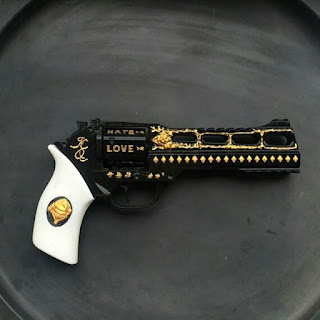
White And Black 'Love' And Hate Gun And Holster
Cheap Water Gun
Gold Paint
Gold Studs
Black Paint
White Paint
Gold Nail Polish
Gold Glitter Glue
1) Paint the white areas of the gun white
2) Let it dry
3) Paint the black areas of the gun black
4) Let it dry
5) Add the gold detailing using the glitter glue, studs, nail polish, and paint where ever they are needed.
6) Let it dry
Holster Bought From Hot Topic:
http://www.hottopic.com/product/studded-gun-holster/10638120.html
'Property Of Joker' Jacket
Bought From Hot Topic:
http://www.hottopic.com/product/dc-comics-suicide-squad-harley-quinn-girls-bomber-jacket/10636441.html
'Puddin' Choker:
Bought From Hot Topic:
http://www.hottopic.com/product/dc-comics-suicide-squad-ivory-gold-puddin-choker/10646226.html
Fishnet Tights
Bought From Walmart:
https://www.walmart.com/ip/George-Women-s-Fishnet-Tights/24360254
Belt:
Bought from Hot Topic:
http://www.hottopic.com/product/dc-comics-suicide-squad-harley-quinn-black-gold-studded-cosplay-belt/10703754.html


